Peripateticism
Yuens' blog

YOLOv2 region层 Forward 部分 DarkNet 源码分析
- 代码仓库:pjreddie/darknet
- 代码版本:61c9d02ec461e30d55762ec7669d6a1d3c356fb2
- 代码日期:2018-09-14
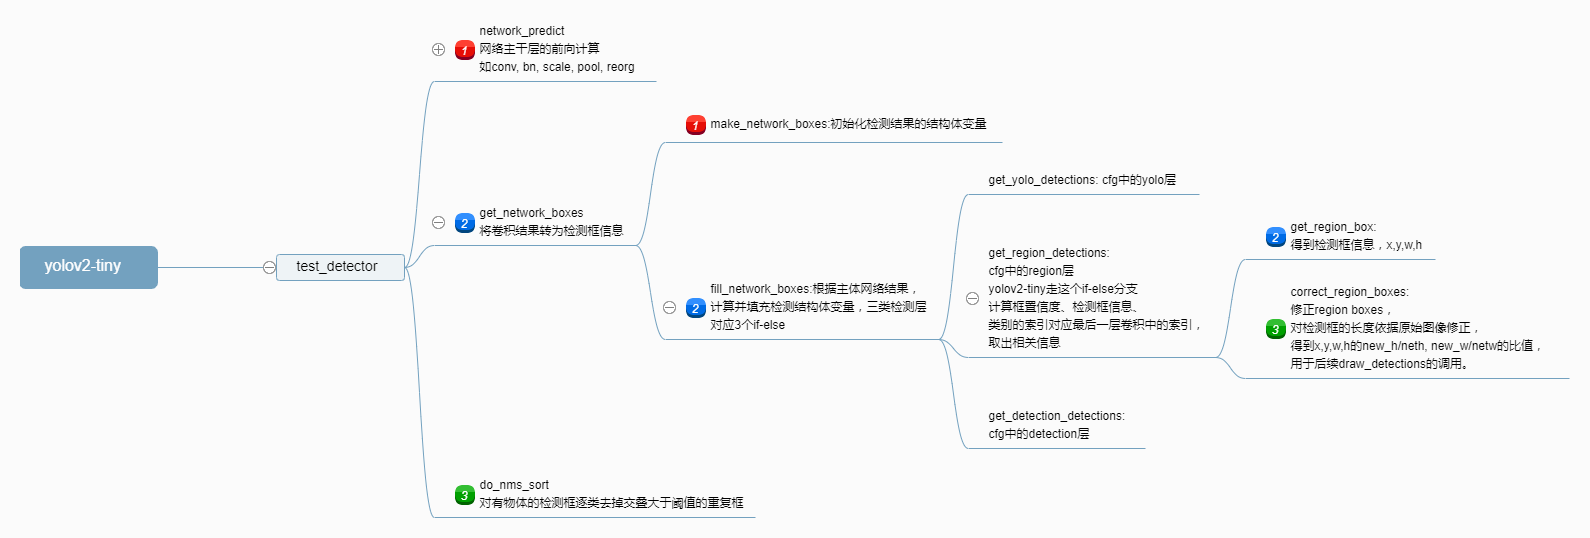
本文以yolov2-tiny这个小网络为例进行分析,在此先给出网络执行流程图。
1. yolov2-tiny 网络结构与 Region 层参数
下面先给出其执行流程图和对应的region层在网络结构cfg文件中的定义,后面会对检测 region 层代码一步一步分析。
1.1 YOLOV2 网络结构
$ ./darknet detect cfg/yolov2-tiny.cfg yolov2-tiny.weights data/dog.jpg
layer     filters    size              input                output
    0 conv     16  3 x 3 / 1   416 x 416 x   3   ->   416 x 416 x  16  0.150 BFLOPs
    1 max          2 x 2 / 2   416 x 416 x  16   ->   208 x 208 x  16
    2 conv     32  3 x 3 / 1   208 x 208 x  16   ->   208 x 208 x  32  0.399 BFLOPs
    3 max          2 x 2 / 2   208 x 208 x  32   ->   104 x 104 x  32
    4 conv     64  3 x 3 / 1   104 x 104 x  32   ->   104 x 104 x  64  0.399 BFLOPs
    5 max          2 x 2 / 2   104 x 104 x  64   ->    52 x  52 x  64
    6 conv    128  3 x 3 / 1    52 x  52 x  64   ->    52 x  52 x 128  0.399 BFLOPs
    7 max          2 x 2 / 2    52 x  52 x 128   ->    26 x  26 x 128
    8 conv    256  3 x 3 / 1    26 x  26 x 128   ->    26 x  26 x 256  0.399 BFLOPs
    9 max          2 x 2 / 2    26 x  26 x 256   ->    13 x  13 x 256
   10 conv    512  3 x 3 / 1    13 x  13 x 256   ->    13 x  13 x 512  0.399 BFLOPs
   11 max          2 x 2 / 1    13 x  13 x 512   ->    13 x  13 x 512
   12 conv   1024  3 x 3 / 1    13 x  13 x 512   ->    13 x  13 x1024  1.595 BFLOPs
   13 conv    512  3 x 3 / 1    13 x  13 x1024   ->    13 x  13 x 512  1.595 BFLOPs
   14 conv    425  1 x 1 / 1    13 x  13 x 512   ->    13 x  13 x 425  0.074 BFLOPs
   15 detection
mask_scale: Using default '1.000000'
Loading weights from yolov2-tiny.weights...Done!
dog: 82%
car: 74%
bicycle: 59%
1.2 Region 层
这里列出最后一个卷积层和 Region 检测层,列出 Region 层的上一层(卷积)的原因是因为输出个数,与检测结果直接相关。
[convolutional]
size=1
stride=1
pad=1
filters=425
activation=linear

[region]
anchors =  0.57273, 0.677385, 1.87446, 2.06253, 3.33843, 5.47434, 7.88282, 3.52778, 9.77052, 9.16828 # anchors的值
bias_match=1
classes=80                  # 类别个数
coords=4                    # 坐标值: x,y,w,h
num=5                       # anchors的个数
softmax=1
jitter=.2
rescore=0

object_scale=5              # loss中栅格中是目标的系数
noobject_scale=1            # loss中栅格中非目标的系数
class_scale=1               # loss中栅格中类别损失的系数
coord_scale=1               # loss中栅格中坐标损失的系数

absolute=1
thresh = .6
random=1
最后卷积层的输出维度为13 x 13 x 425 = 71825,输出元素个数与检测层一样,检测层的维度需要这么看:13 x 13 x 5 x (4 + 1 + 80):
- 对应将 resize 过后宽高为
416 x 416的原图,在经过 5 个stride = 2的max-pooling后为13 x 13,即将原图最后切分为13 x 13个区域; - 5 个 anchors ,对应每个区域有 5 种比例,那么会得到
13 x 13 x 5个检测框; - 4 个坐标参数(检测框的二维中心点坐标x、y、该检测框的高与宽h、w),1 个框的置信度 confidence 分数,以及 80 个概率值对应当前检测框 80 类物体中的存在概率。
所以,检测层对最后一个卷积的结果没有做变换,只是以训练预设的方式将最后一层卷积的结果解析出来。
2.锁定网络主干与检测起始位置
2.1 锁定网络主干
先看网络主干部分,按我们的理解,整个网络的计算应该会有循环来逐层计算,经过在代码里加入打印信息,可以定位在src/network.c中的forward_network函数,计算了每层的结果(找到这一层可以看命令的调用,所出发的代码,一步步加入打印信息,在这之前可以先看看darknet.h这一头文件,该头文件定义了darknet对层、网络的定义,看完后会对框架有一个大概的了解),也是在这里可以每一层的的结果打印出来。其forward_network函数内容如下:
void forward_network(network *netp)
{
#ifdef GPU
    if(netp->gpu_index >= 0){
        forward_network_gpu(netp);
        return;
    }
#endif
    network net = *netp;
    int i;
    for(i = 0; i < net.n; ++i){
        net.index = i;
        layer l = net.layers[i];
        if(l.delta){
            fill_cpu(l.outputs * l.batch, 0, l.delta, 1);
        }
        l.forward(l, net);
        net.input = l.output;

        // print input here

        if(l.truth) {
            net.truth = l.output;
        }
    }
    calc_network_cost(netp);
}
需要注意的是,打印的第i层的结果其实都是第i+1层的输入。因而打印最后卷积的结果,即检测的输入,即第15层的input,所以在上面代码打印处,需要判断i == 15。实际上面最后一层detection的计算并不在这个循环里,是一个后处理的过程。
取到最后一层卷积的结果,根据前面的网络执行结构图的输入输出信息,我们也可以最后一个卷积结果的元素个数是否是echo "13*13*425" | bc,从而确认是否执行到了最后一个卷积层。下一步就是看看检测这一后处理的计算过程。
2.2 锁定检测起始位置
仍旧在src/network.c中查找调用了forward_network的函数,发现是network_predict,仍旧是在该文件,发现调用network_predict的函数有多个:network_predict_image,network_predict_data_multi,network_predict_data,感觉这样找反而越来越多,那么反着麻烦,看正向的代码执行过程。
由于调用的命令是./darknet detect cfg/yolov2-tiny.cfg yolov2-tiny.weights data/dog.jpg,那么看看example/darknet.c中main函数的detect这部分代码(别急,再看一眼if-else结束,发现是return 0,那就可以放心了):
else if (0 == strcmp(argv[1], "detect")){
        float thresh = find_float_arg(argc, argv, "-thresh", .5);
        char *filename = (argc > 4) ? argv[4]: 0;
        char *outfile = find_char_arg(argc, argv, "-out", 0);
        int fullscreen = find_arg(argc, argv, "-fullscreen");
        test_detector("cfg/coco.data", argv[2], argv[3], filename, thresh, .5, outfile, fullscreen);
    }
深入test_detector探究,找到该函数位于examples/detector.c:562,这个函数很长,不过条理还算清晰,可以看到里面有调用forward_network的network_predict函数:
void test_detector(char *datacfg, char *cfgfile, char *weightfile, char *filename, float thresh, float hier_thresh, char *outfile, int fullscreen)
{
    list *options = read_data_cfg(datacfg);
    char *name_list = option_find_str(options, "names", "data/names.list");
    char **names = get_labels(name_list);

    image **alphabet = load_alphabet();
    network *net = load_network(cfgfile, weightfile, 0);
    set_batch_network(net, 1);
    srand(2222222);
    double time;
    char buff[256];
    char *input = buff;
    float nms=.45;
    while(1){
        if(filename){
            strncpy(input, filename, 256);
        } else {
            printf("Enter Image Path: ");
            fflush(stdout);
            input = fgets(input, 256, stdin);
            if(!input) return;
            strtok(input, "\n");
        }
        image im = load_image_color(input,0,0);
        image sized = letterbox_image(im, net->w, net->h);
        //image sized = resize_image(im, net->w, net->h);
        //image sized2 = resize_max(im, net->w);
        //image sized = crop_image(sized2, -((net->w - sized2.w)/2), -((net->h - sized2.h)/2), net->w, net->h);
        //resize_network(net, sized.w, sized.h);
        layer l = net->layers[net->n-1];


        float *X = sized.data;
        time=what_time_is_it_now();
        network_predict(net, X); // 该函数调用了forward_network
        printf("%s: Predicted in %f seconds.\n", input, what_time_is_it_now()-time);
        int nboxes = 0;
        detection *dets = get_network_boxes(net, im.w, im.h, thresh, hier_thresh, 0, 1, &nboxes);
        //printf("%d\n", nboxes);
        //if (nms) do_nms_obj(boxes, probs, l.w*l.h*l.n, l.classes, nms);
        if (nms) do_nms_sort(dets, nboxes, l.classes, nms);
        draw_detections(im, dets, nboxes, thresh, names, alphabet, l.classes);
        free_detections(dets, nboxes);
        if(outfile){
            save_image(im, outfile);
        }
        else{
            save_image(im, "predictions");
#ifdef OPENCV
            make_window("predictions", 512, 512, 0);
            show_image(im, "predictions", 0);
#endif
        }
        free_image(im);
        free_image(sized);
        if (filename) break;
    }
}
该函数显示了整个网络执行的轮廓,其中部分行代码被作者注释掉了,其实刚刚我们将代码跟到了network_predict函数,可以在上面这个函数里找到network_predict,其实现是将network_forward的结果直接返回,从这里我们开始,忽略掉网络初始化和后面处理的无关代码,简化后,我们只需要test_detector函数中以下代码的实现:
        network_predict(net, X);
        printf("%s: Predicted in %f seconds.\n", input, what_time_is_it_now()-time);
        int nboxes = 0;
        detection *dets = get_network_boxes(net, im.w, im.h, thresh, hier_thresh, 0, 1, &nboxes);
        if (nms) do_nms_sort(dets, nboxes, l.classes, nms); // nms:.45,nms值前面写死的0.45,非0会执行do_nms_sort
        draw_detections(im, dets, nboxes, thresh, names, alphabet, l.classes);
- 看了这部分代码,可以看出darknet给出的网络预测时间,实际上是不算后处理(nms,detect等)的网络执行时间;
- 从这个轮廓来看,检测层,也就是后处理部分大致有:
get_network_boxes、do_nms_sort两部分; - 执行结束
network_predict时,net这个结构体变量已经挂载了最后卷积的结果(具体说来是network_forward函数中有一句net.input = l.output;)。
到此,我们找到了检测层计算的起始位置。
3.检测层分析
刚已经说到检测层致有:get_network_boxes、do_nms_sort两部分。
3.1 检测层:获取检测框
接下来,上面代码中net被传给get_network_boxes得到det结构体,需要仔细看看get_network_boxes是怎么做的。这其中会有基于最后一层卷积结果的region层计算。其要点如下:
get_network_boxes流程如下:
make_network_boxes:初始化申请检测框结构体内存(检测框的定义可在include/darknet.h中找到detection与box结构体);fill_network_boxes:将检测层上一层(卷积)的结果填充到detection与box结构体变量中;get_yolo_detections:cfg中的yolo层,yolov2-tiny没有执行该层;get_region_detections:cfg中的region层,yolov2-tiny有该层;region层主体部分的计算;get_region_box;correct_region_boxes;
get_detection_detections:cfg中的detection层,yolov2-tiny没有执行该层。
经过以上两个大的步骤,得到了最后检测框的结果。
3.1.1 检测层:get_network_boxes
get_network_boxes位于src/network.c:589,函数实现如下:
detection *get_network_boxes(network *net, int w, int h, float thresh, float hier, int *map, int relative, int *num)
{
    fprintf(stderr, "==== get_network_boxes ====\n");
    fprintf(stderr, "int nboxes = 0;\n");
    fprintf(stderr, "get_network_boxes(net, im.w, im.h, thresh, hier_thresh, 0, 1, &nboxes)\n");
    fprintf(stderr, "w:%d h:%d\n", w, h);        // w:768 h:576 原始图像的大小
    fprintf(stderr, "thresh:%f\n", thresh);      // 0.500000 位于example/darknet.c:432-437,if-else在detect部分定义,若用户未定义则该值默认为0.5
    fprintf(stderr, "hier:%f\n", hier);          // 0.500000 位于example/darknet.c:432-437,if-else在detect部分定义,值为0.5
    fprintf(stderr, "relative:%d\n", relative);  // 1        位于example/detector.c:600,值被固定为1
    detection *dets = make_network_boxes(net, thresh, num);
    fill_network_boxes(net, w, h, thresh, hier, map, relative, dets);
    return dets;
}

// 又看了下include/darknet.h中关于detection与box这两个结构体的定义
typedef struct detection{
    box bbox;
    int classes;
    float *prob;
    float *mask;
    float objectness;
    int sort_class;
} detection;

typedef struct{
    float x, y, w, h;
} box;
该函数做了两件事:先调用make_network_boxes对detection结构体变量初始化,后调用fill_network_boxes填充值到其中。make_network_boxes先看看其初始化过程:
detection *make_network_boxes(network *net, float thresh, int *num) {
    fprintf(stderr, "==== make_network_boxes ====\n");
    fprintf(stderr, "net->n:%d\n", net->n);                  // net->n:16
    layer l = net->layers[net->n - 1];                             // 拿到最后一层
    int i;                                                                  // 初始化 i 用来后面遍历 nboxes
    int nboxes = num_detections(net, thresh);                    // 调用num_detection(net, thresh)获取到boxes的数量
    fprintf(stderr, "nboxes:%d\n", nboxes);                   // nboxes:845
    fprintf(stderr, "l.coords:%d\n", l.coords);                 // l.coords:4
    if(num) *num = nboxes;                                          // 初始时num作为指针传入,实际结果需要返回去
    detection *dets = calloc(nboxes, sizeof(detection));         // 申请空间,nboxes个detection元素的结构体数组
    for(i = 0; i < nboxes; ++i){                                        // 初始化每个detection box
        dets[i].prob = calloc(l.classes, sizeof(float));               // 每个detection box都有一个classes元素个数的float *prob数组,对应当前box每个类别的概率
        if(l.coords > 4){ // 坐标数目大于4放到mask中,coords定义在cfg文件中,即每个box的四个坐标,yolov1到v3的cfg文件中定义均为4
            dets[i].mask = calloc(l.coords-4, sizeof(float));
        }
    }
    return dets;
}
num_detections函数返回网络结果的box数量,其函数定义在src/network.c:538:
int num_detections(network *net, float thresh)
{
    fprintf(stderr, "==== num_detections ====\n");
    int i;
    int s = 0; // 返回box的数量
    for(i = 0; i < net->n; ++i)
    { //该过程,累加YOLO、DETECTION、REGION类型的层的box
        layer l = net->layers[i];
        if(l.type == YOLO){
            fprintf(stderr, "layer idx: %d type: YOLO\n", i);
            s += yolo_num_detections(l, thresh);
        }
        if(l.type == DETECTION || l.type == REGION){ // yolov2和yolov2-tiny的网络配置cfg文件中,检测层定义均为region
           fprintf(stderr, "layer idx: %d type: DETECTION || REGION\n", i); // layer idx: 15 type: DETECTION || REGION
           fprintf(stderr, "l.w:%d l.h:%d l.n:%d\n", l.w, l.h, l.n); // l.w:13 l.h:13 l.n:5
           s += l.w*l.h*l.n;   // 这里是检测框的个数对应最终feature map的二维点数乘以anchor数目,即13x13x5,网络输出总个数是h*w*anchor_num*(coord_num + conf + class_num),即13*13*5*(5+80)
        }
    }
    fprintf(stderr, "s:%d\n", s); // s:845
    return s;
}
- 对于输入图像尺寸为
416 x 416 x 3,经过网络中5个stride = 2的max-pooling尺寸缩小32倍,得到输出的特征图的宽高为13(=416/32)(输出特征图的通道数下面会提到); - 输入图像尺寸
Si x Si,输出特征图宽高为Oi = Si / 2^5; - 最后卷积层输出数目定义的由来:输出图像为Oi x Oi个栅格,每个栅格预测#anchors种boxes大小,每个box包含4个坐标值(x,y,h,w,即中心点坐标+宽度和高度偏移量),1个置信度和#classes个条件类别概率,所以输出维度是
Oi x Oi x #anchors x (5 + #classes); - tiny-yolov2中,输入大小
416 x 416 x 3,输出大小13 x 13 x 425,其中的输出通道个数425,也即最后卷积层的输出通道个数的计算就是根据:输出宽度 x 输出高度 x anchors数目 x (坐标信息数目 + 类别数目)得到的,除去图像二维的乘积,其中要注意坐标信息数目是5(x,y,h,w,conf,conf置信度,其反映是否包含物体以及包含物体情况下位置的准确性,在YOLOv1中的定义为Pr(Object)×IOU^truth_pred,其中Pr(Object)∈{0,1}。),因而是425 = 5 x (4+1+80)。
3.1.2 检测层:fill_network_boxes
detection *dets = make_network_boxes(net, thresh, num);对检测框的结构体数组变量初始化结束后,紧接着是填充初始化的结构体,即fill_network_boxes(net, w, h, thresh, hier, map, relative, dets);,该函数实现位于src/network.c:569:
void fill_network_boxes(network *net, int w, int h, float thresh, float hier, int *map, int relative, detection *dets)
{
    fprintf(stderr, "==== fill_network_boxes ====\n");
    int j;
    for(j = 0; j < net->n; ++j){
        layer l = net->layers[j];
        if(l.type == YOLO){
            fprintf(stderr, "YOLO\n");
            int count = get_yolo_detections(l, w, h, net->w, net->h, thresh, map, relative, dets);
            dets += count;
        }
        if(l.type == REGION){
            fprintf(stderr, "REGION\n");
            get_region_detections(l, w, h, net->w, net->h, thresh, map, hier, relative, dets);
            dets += l.w*l.h*l.n;
        }
        if(l.type == DETECTION){
            fprintf(stderr, "DETECTION\n");
            get_detection_detections(l, w, h, thresh, dets);
            dets += l.w*l.h*l.n;
        }
    }
}
与num_detections一样有对YOLO、REGION、DETECTION层类型的if-else分支判断,tiny-yolov2模型走的是l.type == REGION这个分支。
3.1.2.1 检测层:卷积结果到检测信息的解析get_region_detections
那么再看看该分支的get_region_detections这个函数对检测框数组填充过程的实现,换言之,也是对卷积结果向检测框结果的解析过程,该函数位于src/region_layer.c:364,在函数开头和结尾部分,我打印出一些变量的值以方便理解代码:
void get_region_detections(layer l, int w, int h, int netw, int neth, float thresh, int *map, float tree_thresh, int relative, detection *dets)
{
    fprintf(stderr, "==== get_region_detections ====\n");
    fprintf(stderr, "l.batch:%d\n", l.batch); // l.batch:1
    fprintf(stderr, "dets[%d].mask:%p\n", 0, dets[0].mask); // dets[0].mask:(nil)
    //if(!(dets[0].mask))
    //    fprintf(stderr, "*(dets[%d].mask):%f\n", 0, *(dets[0].mask));
    fprintf(stderr, "l.softmax_tree:%p\n", l.softmax_tree); // l.softmax_tree:(nil)
    fprintf(stderr, "map:%p\n", map); // map:(nil)
    fprintf(stderr, "l.batch:%d\n", l.batch); // l.batch:1
    fprintf(stderr, "l.n:%d\n", l.n); // l.n:5
    fprintf(stderr, "l.h:%d\n", l.h); // l.h:13
    fprintf(stderr, "l.w:%d\n", l.w); // l.w:13
    fprintf(stderr, "l.classes:%d\n", l.classes); // l.classes:80
    fprintf(stderr, "l.coords:%d\n", l.coords); // l.coords:4
    fprintf(stderr, "l.background:%d\n", l.background); // l.background:0
    fprintf(stderr, "thresh:%f\n", thresh); // thresh:0.500000,  0.500000 位于example/darknet.c:432-437,if-else在detect部分定义,若用户未定义则该值默认为0.5
    fprintf(stderr, "tree_thresh:%f\n", tree_thresh); // tree_thresh:0.500000,位于example/darknet.c同上附近的位置,变量hier,if-else在detect部分定义为0.5

    int i,j,n,z;
    float *predictions = l.output;
    if (l.batch == 2) {
        float *flip = l.output + l.outputs;
        for (j = 0; j < l.h; ++j) {
            for (i = 0; i < l.w/2; ++i) {
                for (n = 0; n < l.n; ++n) {
                    for(z = 0; z < l.classes + l.coords + 1; ++z){
                        int i1 = z*l.w*l.h*l.n + n*l.w*l.h + j*l.w + i;
                        int i2 = z*l.w*l.h*l.n + n*l.w*l.h + j*l.w + (l.w - i - 1);
                        float swap = flip[i1];
                        flip[i1] = flip[i2];
                        flip[i2] = swap;
                        if(z == 0){
                            flip[i1] = -flip[i1];
                            flip[i2] = -flip[i2];
                        }
                    }
                }
            }
        }
        for(i = 0; i < l.outputs; ++i){
            l.output[i] = (l.output[i] + flip[i])/2.;
        }
    }
    for (i = 0; i < l.w*l.h; ++i){
        int row = i / l.w;
        int col = i % l.w;
        for(n = 0; n < l.n; ++n){
            int index = n*l.w*l.h + i;
            for(j = 0; j < l.classes; ++j){
                dets[index].prob[j] = 0;
            }
            int obj_index  = entry_index(l, 0, n*l.w*l.h + i, l.coords);
            int box_index  = entry_index(l, 0, n*l.w*l.h + i, 0);
            int mask_index = entry_index(l, 0, n*l.w*l.h + i, 4);
            float scale = l.background ? 1 : predictions[obj_index];
            dets[index].bbox = get_region_box(predictions, l.biases, n, box_index, col, row, l.w, l.h, l.w*l.h);
            dets[index].objectness = scale > thresh ? scale : 0;
            if(dets[index].mask){
                for(j = 0; j < l.coords - 4; ++j){
                    dets[index].mask[j] = l.output[mask_index + j*l.w*l.h];
                }
            }

            int class_index = entry_index(l, 0, n*l.w*l.h + i, l.coords + !l.background);
            if(l.softmax_tree){

                hierarchy_predictions(predictions + class_index, l.classes, l.softmax_tree, 0, l.w*l.h);
                if(map){
                    for(j = 0; j < 200; ++j){
                        int class_index = entry_index(l, 0, n*l.w*l.h + i, l.coords + 1 + map[j]);
                        float prob = scale*predictions[class_index];
                        dets[index].prob[j] = (prob > thresh) ? prob : 0;
                    }
                } else {
                    int j =  hierarchy_top_prediction(predictions + class_index, l.softmax_tree, tree_thresh, l.w*l.h);
                    dets[index].prob[j] = (scale > thresh) ? scale : 0;
                }
            } else {
                if(dets[index].objectness){
                    for(j = 0; j < l.classes; ++j){
                        int class_index = entry_index(l, 0, n*l.w*l.h + i, l.coords + 1 + j);
                        float prob = scale*predictions[class_index];
                        dets[index].prob[j] = (prob > thresh) ? prob : 0;
                    }
                }
            }
        }
    }
    fprintf(stderr, "l.w:%d\n", l.w); // l.w:13
    fprintf(stderr, "l.h:%d\n", l.h); // l.h:13
    fprintf(stderr, "l.n:%d\n", l.n); // l.n:5
    fprintf(stderr, "w:%d\n", w); // w:768
    fprintf(stderr, "h:%d\n", h); // h:576
    fprintf(stderr, "netw:%d\n", netw); // netw:416
    fprintf(stderr, "neth:%d\n", neth); // neth:416
    fprintf(stderr, "relative:%d\n", relative); // relative:1

    correct_region_boxes(dets, l.w*l.h*l.n, w, h, netw, neth, relative);
}
这个函数非常冗长,我在该函数内加入打印信息,可以看到有些指针是空的,这样将代码中if-else不会走到的地方、没有用到的变量都移除掉,可进一步简化get_region_detections为如下流程和代码:
- 初始化检测框中的所有类别概率;
- 根据box索引求解region box检测框,并根据obj索引计算概率判断检测框有效性;
- 对有效的检测框,根据class索引判断有效的物体得到类别概率;
- 对检测框的长度依据原始图像修正,得到x,y,w,h的new_h/neth, new_w/netw的比值。
void get_region_detections(layer l, int w, int h, int netw, int neth, float thresh, int *map, float tree_thresh, int relative, detection *dets)
{
    fprintf(stderr, "==== get_region_detections ====\n");
    fprintf(stderr, "l.batch:%d\n", l.batch); // l.batch:1
    fprintf(stderr, "dets[%d].mask:%p\n", 0, dets[0].mask); // dets[0].mask:(nil)
    //if(!(dets[0].mask))
    //    fprintf(stderr, "*(dets[%d].mask):%f\n", 0, *(dets[0].mask));
    fprintf(stderr, "l.softmax_tree:%p\n", l.softmax_tree); // l.softmax_tree:(nil)
    fprintf(stderr, "map:%p\n", map); // map:(nil)
    fprintf(stderr, "l.batch:%d\n", l.batch); // l.batch:1
    fprintf(stderr, "l.n:%d\n", l.n); // l.n:5
    fprintf(stderr, "l.h:%d\n", l.h); // l.h:13
    fprintf(stderr, "l.w:%d\n", l.w); // l.w:13
    fprintf(stderr, "l.classes:%d\n", l.classes); // l.classes:80
    fprintf(stderr, "l.coords:%d\n", l.coords); // l.coords:4
    fprintf(stderr, "l.background:%d\n", l.background); // l.background:0
    fprintf(stderr, "thresh:%f\n", thresh); // thresh:0.500000,  0.500000 位于example/darknet.c:432-437,if-else在detect部分定义,若用户未定义则该值默认为0.5。后面两次用到(1. 物体存在与否的阈值,2. 类别存在与否的阈值)
    fprintf(stderr, "tree_thresh:%f\n", tree_thresh); // tree_thresh:0.500000,位于example/darknet.c同上附近的位置,变量hier,if-else在detect部分定义为0.5
    fprintf(stderr, "l.nbiases:%d\n", l.nbiases); // l.nbiases:0,注意这个biases成员是卷积的,而不是anchor的
    for(int i=0; i<2*n; i++) {
        fprintf(stderr, "l.biases[%d]:%f\n", i, l.biases[i]); // 注:这个是anchor的biases,即anchor的值(和卷积的biases无关),其数值与cfg文件的anchors值一致。一般该数组元素个数是2*n,n是anchor个数。anchor是否与原图匹配的定义是cfg文件中的bias_match,bias_match用在region_layer.c 的 forward_region_layer 中推算预测的检测框的w和h前的判断。
    }

    int i,j,n;
    float *predictions = l.output;

    for (i = 0; i < l.w*l.h; ++i){
        int row = i / l.w; // 行优先存储,计算当前行数与列数
        int col = i % l.w;
        /* 1. 初始化检测框中的所有类别概率 */
        for(n = 0; n < l.n; ++n){
            int index = n*l.w*l.h + i; // 计算结果feature map的下标index[0,n*l.w*l.h),也即检测框数组dets中的第index个检测框元素
            for(j = 0; j < l.classes; ++j){ // 初始化n*l.w*l.h个检测框的l.classes个类别对应的概率值
                dets[index].prob[j] = 0; // 初始化第 index 个检测框对应类别 j 的概率
            }

            /* 2. 根据box索引求解region box检测框,并根据obj索引计算概率判断检测框有效性 */
            // 拿到第 index 个检测框对应结果feature map的obj下标与box下标
            int obj_index  = entry_index(l, 0, n*l.w*l.h + i, l.coords); // index  ==  n*l.w*l.h + i,obj包含1个信息: conf
            int box_index  = entry_index(l, 0, n*l.w*l.h + i, 0); // index  ==  n*l.w*l.h + i,box包含4个信息:x,y,h,w

            // 获取第 index 个检测框的类别 prob 缩放系数
            float scale = l.background ? 1 : predictions[obj_index]; // l.background:0
            dets[index].bbox = get_region_box(predictions, l.biases, n, box_index, col, row, l.w, l.h, l.w*l.h);
            dets[index].objectness = scale > thresh ? scale : 0; // 判断第 index 个框内是否有物体,根据是否大于预设的默认的0.5,决定第 index 个检测框的结果featuremap的值是否有意义(若有意义则取出如下的prob信息)

                /* 3. 对有效的检测框,根据class索引判断有效的物体得到类别概率 */
                // 若第 index 个检测框有意义,则取出所有类的概率
                // 逐一取出对应类别概率在输出的feature map的值并判断与阈值的大小关系
                if(dets[index].objectness){
                    for(j = 0; j < l.classes; ++j){
                        int class_index = entry_index(l, 0, n*l.w*l.h + i, l.coords + 1 + j);
                        float prob = scale*predictions[class_index];
                        dets[index].prob[j] = (prob > thresh) ? prob : 0;
                    }
                }

        }
    }
    fprintf(stderr, "l.w:%d\n", l.w); // l.w:13
    fprintf(stderr, "l.h:%d\n", l.h); // l.h:13
    fprintf(stderr, "l.n:%d\n", l.n); // l.n:5
    fprintf(stderr, "w:%d\n", w); // w:768
    fprintf(stderr, "h:%d\n", h); // h:576
    fprintf(stderr, "netw:%d\n", netw); // netw:416
    fprintf(stderr, "neth:%d\n", neth); // neth:416
    fprintf(stderr, "relative:%d\n", relative); // relative:1

    /* 4. 对检测框的长度依据原始图像修正,得到x,y,w,h的new_h/neth, new_w/netw的比值 */
    correct_region_boxes(dets, l.w*l.h*l.n, w, h, netw, neth, relative);
}

int entry_index(layer l, int batch, int location, int entry)
{
    // obj_index  = entry_index(l, 0, n*l.w*l.h + i, l.coords); // l.coords: 4, i: [0, l.w*l.h)
    // box_index  = entry_index(l, 0, n*l.w*l.h + i, 0); // i: [0, l.w*l.h)
    // class_index = entry_index(l, 0, n*l.w*l.h + i, l.coords + 1 + j); // j: [0, l.classes)
    int n =  location / (l.w*l.h); // 第 n 个anchor, n: [0, max_anchors_num),
    int loc = location % (l.w*l.h); // 第 n 个 anchor 中的第 loc 个框, loc: [0, l.w*l.h)
    // 第batch个(本例为0),batch=1时总的输出feature map元素数目:5*13*13*(80+4+1),
    // 第 n 个anchor,因而是 n * l.w * l.h * (l.coords+l.classes+1),多+1是conf置信度(其反映是否包含物体以及包含物体情况下位置的准确性,具体见上文)
    return batch*l.outputs + n*l.w*l.h*(l.coords+l.classes+1) + entry*l.w*l.h + loc;
}

box get_region_box(float *x, float *biases, int n, int index, int i, int j, int w, int h, int stride)
{
    // get_region_box(predictions, l.biases, n, box_index, col, row, l.w, l.h, l.w*l.h);
    // row: [0, l.h),  col: [0, l.w)
    box b;
    b.x = (i + x[index + 0*stride]) / w;
    b.y = (j + x[index + 1*stride]) / h;
    b.w = exp(x[index + 2*stride]) * biases[2*n]   / w; // 这里biases是anchors的值,biases[2*n]和[2*n+1]分别对应w与h的放缩比例
    b.h = exp(x[index + 3*stride]) * biases[2*n+1] / h;
    return b;
}
下面是第4部分correct_region_boxes:修正region boxes,对检测框的长度依据原始图像修正,得到x,y,w,h的new_h/neth, new_w/netw的比值,用于后续draw_detections的调用。
void correct_region_boxes(detection *dets, int n, int w, int h, int netw, int neth, int relative)
{
    fprintf(stderr, "==== correct_region_boxes ====\n");
    fprintf(stderr, "n:%d\n", n); // n:845
    fprintf(stderr, "w:%d\n", w); // w:768
    fprintf(stderr, "h:%d\n", h); // h:576
    fprintf(stderr, "netw:%d\n", netw); // netw:416
    fprintf(stderr, "neth:%d\n", neth); // neth:416
    fprintf(stderr, "relative:%d\n", relative); // relative:1

    /* 根据网络输入大小,重新调整检测框的位置信息。
        将原图等比例缩放,确保缩放后的图不会超出网络输入大小
      (等比例缩放过程中将宽高中的较大值,
          网络输入对应的宽或高,进行等比例缩放)。
    */
    int i;
    int new_w=0;
    int new_h=0;
    if (((float)netw/w) < ((float)neth/h)) {
        new_w = netw;
        new_h = (h * netw)/w;
    } else {
        new_h = neth;
        new_w = (w * neth)/h;
    }
    fprintf(stderr, "new_h:%d\n", new_h); // new_h:312
    fprintf(stderr, "new_w:%d\n", new_w); // new_w:416

    /* 遍历所有检测框,根据比例调整x,y,h,w */
    for (i = 0; i < n; ++i){
        box b = dets[i].bbox;
        fprintf(stderr, "1 b.x:%f b.y:%f b.h:%f b.w:%f\n", b.x, b.y, b.h, b.w);
        // 1 b.x:0.034133 b.y:0.038086 b.h:0.018859 b.w:0.022933

        // b.x/和b.y原本的计算,是先对原图resize等比例到网络输入大小,计算所在比例值
        // b.h, b.w应该同上
        // x,y,w,h都乘以新的比率更新,再乘以该比例系数: (netw/new_w) 或 (neth/new_h)
        // x, y的除,等同于乘系数
        b.x =  (b.x - (netw - new_w)/2./netw) / ((float)new_w/netw); // 先减new_w带来的偏移量的原有占比,再除系数的倒数(=乘系数)
        b.y =  (b.y - (neth - new_h)/2./neth) / ((float)new_h/neth);
        b.w *= (float)netw/new_w;
        b.h *= (float)neth/new_h;
        if(!relative){ // relative:1
            b.x *= w;
            b.w *= w;
            b.y *= h;
            b.h *= h;
        }
        fprintf(stderr, "2 b.x:%f b.y:%f b.h:%f b.w:%f\n", b.x, b.y, b.h, b.w);
        // 2 b.x:0.034133 b.y:-0.115885 b.h:0.025146 b.w:0.022933
        dets[i].bbox = b;
    }
}
为了更清楚阐明几个检测信息,查了draw_detections时调用box里的x,y,w,h处的代码,计算得到检测框的上下左右四个值:
im.w和im.h分别为原图的列数与行数;x、y: 分别对应检测框中心点的横、纵坐标(的比例值);h、w:分别对应检测框高度和宽度(的比例值)。
            int left  = (b.x-b.w/2.)*im.w;
            int right = (b.x+b.w/2.)*im.w;
            int top   = (b.y-b.h/2.)*im.h;
            int bot   = (b.y+b.h/2.)*im.h;
以上,便分析完了网络检测部分的get_network_boxes。
3.1.3 检测层:region过程总结
简单总结下region前向过程,这部分不仅申请检测框的空间和初始化工作,同时也根据网络最后一个卷积的输出feature map做了相应的计算,转化为对应检测框结构体中的中心点、检测框长宽信息、每个类别概率、每个检测框置信度等信息。并在这个过程中对结果进行了两次筛选:
- 第一次是依据阈值对检测框是否存在物体的if-else筛选;
- 第二次是依据同一个阈值对检测框中物体概率的if-else筛选。
特别需要注意的是,检测框总数目是anchor数乘以feature map的宽高,检测框数目是由最后一个卷积的维度确定的(这包括两个部分:最后卷积的二维大小,即宽高,以及检测框锚点anchor数),其实仔细想想这反而将网络在检测结果的最大框数进行固定了,虽然整个网络是全卷积对输入大小不关心,但在检测这一项,若图像中目标很多,超过预设的13 x 13 x 5,这两个超参数也会对结果造成很大的影响。最后一个卷积的二维维度大小是由stride = 2的卷积或者池化的个数决定的,锚点anchors数目是由用户自己设定的。
我也想了如何自适应设置这两个超参数:
- 卷积,可以跑所有标注图片的数据,看看每张图有多少个框,进而确定总框数设置多少合适,进而设计最后一个卷积层的输出宽高通道数;
- 锚点anchor数目的设定,可以跑出所有标注检测框的比例,当然这部分还需要细致考虑,因为每一种类别的检测框比例有多种,可以依据这个思路更精细地设置锚点。
但在做这些前,需要考量一下这些工作对精度结果的提升预估,从而合理花费时间去设计更值得做的工作。
3.2 检测层:非极大值抑制do_nms_sort
在第一部分将卷积结果转换为检测框信息后,紧接着便是非极大值抑制过程,该过程会对交叠大于某个阈值的两个检测框视为检测到同一个物体,而进行去掉其中一个的操作,该完整操作流程如下:
- 筛选所有可能有物体的检测框。即通过交换,让检测框数组中前
total个的检测框均符合dets[i].objectness!=0; - 逐类去掉重复检测框。在锁定某个类别 k 后
sort_class = k:- 对
total个检测框,依据第 k 类进行降序排序; - 两层循环计算检测框
dets[i]与检测框dets[j]的IOU(intersection of union):- 若
box_iou(dets[i], dets[j]) > thresh,则在第 k 类的检测结果中去掉检测框dets[j](即前面按照第 k 类降序排列,k类概率小的框),将该检测框对应第 k 类概率置为 0 ,即dets[j].prob[k] = 0,后面再在第 k 类中遇到该框时直接continue跳过; - 若
box_iou(dets[i], dets[j]) <= thresh,则说明没有两个检测框重叠,继续下一个检测框;
- 若
- 重复1,2直至遍历结束完
total个检测框;
- 对
- 重复1,2直至遍历完
classes个类别。
        network_predict(net, X);
        printf("%s: Predicted in %f seconds.\n", input, what_time_is_it_now()-time);
        int nboxes = 0;
        detection *dets = get_network_boxes(net, im.w, im.h, thresh, hier_thresh, 0, 1, &nboxes);
        if (nms) do_nms_sort(dets, nboxes, l.classes, nms); // nms:.45,nms值前面写死的0.45,非0会执行do_nms_sort
        draw_detections(im, dets, nboxes, thresh, names, alphabet, l.classes);
接下来是第三部分的分析,第三部分是do_nms_sort的计算,先找到并给出该函数的位置和代码./src/box.c:58:
void do_nms_sort(detection *dets, int total, int classes, float thresh)
{
    // do_nms_sort(dets, nboxes, l.classes, nms); // nms: .45
    fprintf(stderr, "==== do_nms_sort ====\n");
    fprintf(stderr, "total:%d\n", total);     // total:845, nboxes
    fprintf(stderr, "classes:%d\n", classes); // classes:80
    fprintf(stderr, "thresh:%f\n", thresh);   // thresh:0.450000

    // 遍历所有total个检测框,之后,得到有意义的 (k+1) 个检测框
    //     将有意义的检测框(即dets[i].objectness非0的)放到检测框数组的前面,
    //     交换后面的检测框(不确保是否objectness的值)与无意义的检测框,
    //     因为--i的缘故,不确保是否有意义的检测框紧接着又会进行判断,从而决定是否交换,
    //     直到k的值被自减到最后一个有意义的检测框,也即for循环结束(因k从0计,因而总的有意义检测框是(k+1))。
    int i, j, k;
    k = total-1;
    for(i = 0; i <= k; ++i){
        if(dets[i].objectness == 0){
            detection swap = dets[i];
            dets[i] = dets[k];
            dets[k] = swap;
            --k;
            --i;
        }
    }
    total = k+1;

    // 逐类别,对所有检测框去重
    // 遍历 classes 个类别,
    //     先选中该类别,即设定sort_class的值,再对所有有意义的检测框按照类别 k 的概率降序排序
    //     比较两个检测框 i, j 的重叠是否大于阈值,大于该阈值说明可能是同一个物体,去掉概率低的(框j),同时设置框 j 第 k 类的概率为 0(后面遇到则continue跳过),即执行了检测框的去重操作
    for(k = 0; k < classes; ++k){
        for(i = 0; i < total; ++i){
            dets[i].sort_class = k;
        }
        qsort(dets, total, sizeof(detection), nms_comparator);
        for(i = 0; i < total; ++i){
            if(dets[i].prob[k] == 0) continue;
            box a = dets[i].bbox;
            for(j = i+1; j < total; ++j){
                box b = dets[j].bbox;
                if (box_iou(a, b) > thresh){
                    dets[j].prob[k] = 0;
                }
            }
        }
    }
}

// qsort的比较函数,用来比较第 k 类时候概率大小
int nms_comparator(const void *pa, const void *pb)
{
    detection a = *(detection *)pa;
    detection b = *(detection *)pb;
    float diff = 0;
    if(b.sort_class >= 0){ // 多类时,sort_class在do_nms_sort中定义就是在这里按照第sort_class类进行排序
        diff = a.prob[b.sort_class] - b.prob[b.sort_class];
    } else { // 这里,我猜想是只有1类的情形
        diff = a.objectness - b.objectness;
    }
    if(diff < 0) return 1;
    else if(diff > 0) return -1;
    return 0;
}

 // iou,intersection of union,
 // 即交集占并集的比例
float box_iou(box a, box b)
{
    return box_intersection(a, b)/box_union(a, b);
}

// 由overlap得到横纵方向上的重叠长度,
// 若两个重叠长度其一小于0则说明两个框没有交叠的地方,即没有交集直接返回0,
// 否则有重叠,重叠面积为两个方向重叠长度的乘积
float box_intersection(box a, box b)
{
    float w = overlap(a.x, a.w, b.x, b.w);
    float h = overlap(a.y, a.h, b.y, b.h);
    if(w < 0 || h < 0) return 0;
    float area = w*h;
    return area;
}

// 由a,b检测框各自的面积减去二者交集的面积,
// 即为并集的面积
float box_union(box a, box b)
{
    float i = box_intersection(a, b);
    float u = a.w*a.h + b.w*b.h - i;
    return u;
}

// 看懂这个函数需要画两个重叠的框,
// 设置中心点的横纵坐标分别为(x1,y1)、(x2,y2),
// 就会清楚最后得到的结果是一个方向上重叠的长度
float overlap(float x1, float w1, float x2, float w2)
{
    float l1 = x1 - w1/2;
    float l2 = x2 - w2/2;
    float left = l1 > l2 ? l1 : l2;
    float r1 = x1 + w1/2;
    float r2 = x2 + w2/2;
    float right = r1 < r2 ? r1 : r2;
    return right - left;
}
以上便是 Darknet 对于检测层的前向计算,更具体的见下方的流程图: